The I turned the radio off and concentrated on the K3 build. Not known for my prowess in being able to walk and chew gum at the same time, I figured it was better if I avoided any HF distractions.
The KX3 and K3 builds are amazingly similar in some ways. The manuals are well thought out as always - this has become an Elecraft "standard". The build starts off by attaching 2D fasteners to the main or RF Circuit Board. The chassis and housing are literally built up around this all important circuit.
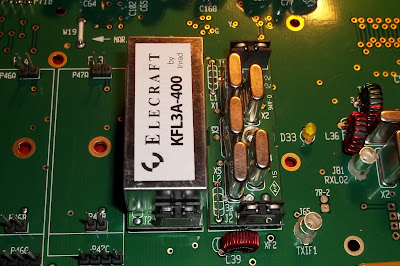
From there, things get added, like the filters. I have the standard 2.7Khz 5 pole filter and the 8 pole 400 Hz roofing filter.
These just go onto their edge connectors and then are secured by a screw and lock washer. For the various modes and bands, there's space for up to five filters. I only have the two installed.
Next came the low power Power Amplifier board. This occupies the big hole you see in the upper center of the first photo.
As far as this K3 goes, that's it. This will be a QRP version, so whatever I get out of this circuit is what I will be sending out to the world.
The next step is to start adding sides, and now this is beginning to look more like what you'd expect a radio to look like.
Installing the Auto Tuner came next. That in itself was easy. it just plugs into the main RF Circuit and is secured by hardware.
The hard part was getting the SO239 connectors plugged in. As you can see in the close up below, there are wires that get plugged into two brass sockets on the auto tuner board. The one wire slid into the socket on the left as smooth as butter. The one on the right was way more picky. I had to make sure the alignment of pin with socket was perfect. Then, and only then, did it go in - and even that took some effort.
Adding the rear panel came next.
If you notice, on the right side, there are two holes. The top is for the I/O circuitry, which got added next. The bottom right hole had a blanking panel installed, as that's the space for an option that I did not purchase.
72 de Larry W2LJ
QRP - When you care to send the very least!


Good evening Larry, your pictures reminded me of the assembly of my k3. It's a wise decision to hold off on the build if you are getting tired. Today I took my k3 apart to preform the mod that will allow me to run my P3 along with the SVGA card from the K3. I had to replace an SMT diode (that was fun) and one cap and inductor. The mod took about 2 hours but was successful. Great pictures by the way.
ReplyDeleteTell us, why does everyone who buys a K3 feel the need to document the assembly process online? Basically, thanks for continuing to spoil the surprise that should await anyone who buys one.
ReplyDeleteLooks good, Larry. I should have bought the autotuner with my K3 as well. Oh well - live & learn...
ReplyDeleteWell done, Larry. It is really fun to follow your blog.
ReplyDeleteHajo
Lookin' good. I'm looking forward to seeing how it all goes together. Maybe there is one in my future!
ReplyDeleteGreat pictures!
"73" Phil AB3AW
Anonymous,
ReplyDeleteFirst off, thanks for reading.
Secondly, I'm sorry I spoiled your surprise. As my 11 year old son put it, "What's the surprise? It's a huge box with pieces you have to put together. I think you knew that when you ordered it."
Thirdly, sorry that you don't want to reveal your name and call. If you had, your comments MIGHT have carried more weight with me. I always try to accommodate REAL comments, Not just gripey ones for the sake of griping.
Fourthly, you can always choose not to read! It's still a free country (at least for a little while longer), Although, after last week, I suppose the Federal Government could choose to tax you for not reading my blog.
Lastly, 73 and have a GREAT day!
Larry W2LJ
Looking good Larry. I don't agree with the comments made by the anonymous poster. Before I built my K2, I spent so much time reading the blogs of others that I knew exactly what to expect. That didn't in any way diminish the excitement when I finally decided to build mine.
ReplyDeleteThe world is full of grumpy old codgers, and this one doesn't even have the strength of character to identify himself and stand fully behind his comments!
Enjoy the rest of your build and let us know how it goes.
Dave
AA7EE